1. เปิดบริการ apache2.0.52 และ mysql5.5.16 ตอนเปิดบริการในเครื่องที่ติดตั้ง skype อาจพบปัญหา port 80 ชนกันได้ครับ
2. เตรียม scripts ในห้อง /moodle19
3. สร้างห้อง /moodledoc19 เตรียมรับข้อมูลจากผู้ใช้
4. เริ่มติดตั้งด้วยการเรียก /moodle19/install.php
5. ต้องแก้ไข register_globals=Off ใน php.ini แล้วก็ restart apache
ถ้าไม่รู้ว่า php.ini อยู่ห้องใดก็เรียก function phpinfo()
6. พบขั้นตอนการติดตั้งดังนี้
– Checking your PHP settings
– Please conform the locations of this Moodle installation
Web Address = http://127.0.0.1/moodle19
Data Directory = C:\thaiabc\moodledata
– Now you need to configure the database
Type = MySQL
Host Server = localhost
Database = moodle19 (Create DB automatically)
User = root
Password = ว่างไว้
– Checking your environment
– Download language pack
– Configuration completed
– Copyright notice
– Current release information Moodle 1.9.12 (Build: 20110510)
– Setting up database : Database was successfully upgraded
– Setup administrator account.
Username = admin
password = Password#2555
– New settings – Front Page settings
Self registration = Email-based self-registration
7. ผลการเรียก http://127.0.0.1/moodle19 พบว่าปกติ
8. สร้างวิชา และ upload แฟ้มภาพ และเรียกใช้แฟ้มภาพ ไม่พบปัญหา
— ขั้นตอนการ Restore course ของ moodle 1.9.12
1. เข้าไปในวิชาที่สร้างไว้แล้ว
2. เลือก Restore
3. เลือกแฟ้มที่ Backup ไว้จาก server อีกตัวหนึ่ง
4. เมื่อถามว่า Restore to
– Current course, deleting it first
– Current course, ading data to it
– new course
5. ทดสอบทั้ง 3 แบบ พบว่าใช้งานได้ปกติ
6. ถ้าทดสอบ new course ก็จะได้วิชาใหม่อีก 1 วิชา ไม่ทับวิชาเดิม
— ขั้นตอนการติดตั้ง senayan3
1. เปิดโปรแกรม phpmyadmin
2. สร้าง db : senayan3 แล้วเข้าไปใน db นี้
3. สั่งประมวลผล sql 2 แฟ้มในห้อง /senayan3/sql/install
4. เริ่มจาก import แฟ้ม senayan.sql ตามด้วย sample_data.sql
5. แก้ไข sysconfig.inc.php
define(‘DB_NAME’, ‘senayan3’);
define(‘DB_USERNAME’, ‘root’);
define(‘DB_PASSWORD’, ”);
6. เข้าระบบด้วย
user: admin
password: admin
7. ทดสอบที่ http://127.0.0.1/senayan3 พบว่าใช้งานได้ปกติ
8. แก้ไขตัวแปรใน sysconfig.inc.php อีก 2 ตัวแปร
$sysconf[‘mysqldump’] = ‘c:/thaiabc/mysql/data’;
$sysconf[‘temp_dir’] = ‘c:/tmp’;
http://www.thaiall.com/blog/burin/3955/ http://slims.web.id/web/ http://sourceforge.net/projects/senayanlib/ http://www.senayan.kru-ple.com/
— SENAYAN 3.0 stable
Core Senayan Developer :
Hendro Wicaksono – hendrowicaksono@yahoo.com
Arie Nugraha – dicarve@yahoo.com
Below are the instructions for new installation of SENAYAN :
1. Put senayan3-stable3 folder in web document root
2. create senayan database in mysql
3. Open your phpMyAdmin or mysql client utility (or other mysql manager softwares) and
run sql/install/senayan.sql inside your SENAYAN application database.
4. Re-check your database configurations and others configuration in sysconfig.inc.php.
5. If you have your own custom template, Adjust detail_template.php file or just overwrite it
with detail_template.php from default template directory
Web Site Development Process – The life-cycle steps
by Benny Alexander
Like the traditional software development, the process of web site development can also be divided into different life cycle steps. This can help to format the team effectively, and the standards and procedures can be adopted to achieve maximum quality. This article explains the steps of development which can be possibly arranged as a process of web engineering. This is just a guideline to help you, to know, how a process can be done. The steps may vary from application to application. Write me your suggestions and comments on this article to enquiry@macronimous.com.
A system development process can follow a number of standard or company specific frameworks, methodologies, modeling tools and languages. Software development life cycle normally comes with some standards which can fulfill the needs of any development team. Like software, web sites can also be developed with certain methods with some changes and additions with the existing software development process. Let us see the steps involve in any web site development.
1. Analysis:
Once a customer is started discussing his requirements, the team gets into it, towards the preliminary requirement analysis. As the web site is going to be a part of a system, It needs a complete analysis as, how the web site or the web based application is going to help the present system and how the site is going to help the business. Moreover the analysis should cover all the aspects especially on how the web site is going to join the existing system. The first important thing is finding the targeted audience. Then, All the present hardware, software, people and data should be considered during the time of analysis. For example, if a company XYZ corp is in need of a web site to have its human resource details online, the analysis team may try to utilize the existing data about the employees from the present database. The analysis should be done in the way, that it may not be too time consuming or with very less informative. The team should be able to come up with the complete cost- benefit analysis and as the plan for the project will be an output of analysis, it should be realistic. To achieve this the analyst should consult the designers, developers and testers to come up with a realistic plan.
Input:Interviews with the clients, Mails and supporting docs by the client, Discussions Notes, Online chat, recorded telephone conversations,Model sites/applications etc.,
Output: 1. Work plan, 2. Cost involved, 3. Team requirements, 4. Hardware-software requirements, 5. Supporting documents and 6. the approval.
2. Specification Building:
Preliminary specifications are drawn up by covering up each and every element of the requirement. For example if the product is a web site then the modules of the site including general layout, site navigation and dynamic parts of the site should be included in the spec. Larger projects will require further levels of consultation to assess additional business and technical requirements. After reviewing and approving the preliminary document, a written proposal is prepared, outlining the scope of the project including responsibilities, timelines and costs.
Input: Reports from the analysis team.
Output: Complete requirement specifications to the individuals and the customer/customer’s representative.
3. Design and development:
After building the specification, work on the web site is scheduled upon receipt of the signed proposal, a deposit, and any written content materials and graphics you wish to include. Here normally the layouts and navigation will be designed as a prototype.
Some customers may be interested only in a full functional prototype. In this case we may need to show them the interactivity of the application or site. But in most of the cases customer may be interested in viewing two or three design with all images and navigation.
There can be a lot of suggestions and changes from the customer side, and all the changes should be freezed before moving into the next phase. The revisions could be redisplayed via the web for the customer to view.
As needed, customer comments, feedback and approvals can be communicated by
e-mail, fax and telephone.
Throughout the design phase the team should develop test plans and procedures for quality assurance. It is necessary to obtain client approval on design and project plans.
In parallel the Database team will sit and understand the requirements and develop the database with all the data structures and sample data will also be prepared.
Input: Requirement specification.
Output: Site design with templates, Images and prototype.
4. Content writing:
This phase is necessary mainly for the web sites. There are professional content developers who can write industry specific and relevant content for the site. Content writers to add their text can utilize the design templates. The grammatical and spelling check should be over in this phase.
Input: Designed template.
Output: Site with formatted content.
5. Coding:
Now its programmers turn to add his code without disturbing the design. Unlike traditional design the developer must know the interface and the code should not disturb the look and feel of the site or application. So the developer should understand the design and navigation. If the site is dynamic then the code should utilize the template. The developer may need to interact with the designer, in order to understand the design. The designer may need to develop some graphic buttons when ever the developer is in need, especially while using some form buttons. If a team of developers is working they should use a CVS to control their sources. Coding team should generate necessary testing plans as well as technical documentation. For example Java users can use JavaDoc to develop their documents to understand their code flow. The end-user documentation can also be prepared by the coding team, which can be used by a technical writer who can understand them, writes helps and manuals later.
Input: The site with forms and the requirement specification.
Output : Database driven functions with the site, Coding documents.
6. Testing:
Unlike software, web based applications need intensive testing, as the applications will always function as a multi-user system with bandwidth limitations. Some of the testing which should be done are, Integration testing, Stress testing, Scalablity testing, load testing, resolution testing and cross-browser compatibility testing. Both automated testing and manual testing should be done without fail. For example its needed to test fast loading graphics and to calculate their loading time, as they are very important for any web site. There are certain testing tools as well as some online testing tools which can help the testers to test their applications. For example ASP developers can use Microsoft’s Web Application Test Tool to test the ASP applications, which is a free tool available from the Microsoft site to download.
After doing all the testing a live testing is necessary for web sites and web based applications. After uploading the site there should be a complete testing(E.g.. Links test)
Input: The site, Requirement specifications, supporting documents, technical specifications and technical documents.
Output: Completed application/site, testing reports, error logs, frequent interaction with the developers and designers.
7. Promotion:
This phase is applicable only for web sites. Promotion needs preparation of meta tags, constant analysis and submitting the URL to the search engines and directories. There is a details article in this site on site promotion, click here to read it. The site promotion is normally an ongoing process as the strategies of search engine may change quite often. Submitting a site URLs once in 2 months can be an ideal submission policy. If the customer is willing, then paid click and paid submissions can also be done with additional cost.
Input: Site with content, Client mails mentioning the competitors.
Output: Site submission with necessary meta tag preparation.
8. Maintenance and Updating:
Web sites will need quite frequent updations to keep them very fresh. In that case we need to do analysis again, and all the other life cycle steps will repeat. Bug fixes can be done during the time of maintenance. Once your web site is operational, ongoing promotion, technical maintenance, content management & updating, site visit activity reports, staff training and mentoring is needed on a regular basis depend on the complexity of your web site and the needs within your organization.
Input: Site/Application, content/functions to be updated, re-Analysis reports.
Output: Updated application, supporting documents to other life cycle steps and teams.
The above-mentioned steps alone are not strict to web application or web site development. Some steps may not applicable for certain tasks. Its depend on the cost and time involved and the necessity. Sometimes if it is a intranet site, then there will be no site promotion. But even if you are a small development firm, if you adopt certain planning along with this web engineering steps in mind, it will definitely reflects in the Quality of the outcome.
During the past Human Factors in Computer Systems conference in San Jose, California there was a lot of attention on the One Laptop Per Child (OLPC) project (see a video). The project goal is: “To provide children around the world with new opportunities to explore, experiment and express themselves.” In the mission statement the website claims that OLPC has been “extensively field-tested and validated among some of the poorest and most remote populations on earth“. While this could be used in conjunction with current teaching, part of the goal is to support self-exploration without the aid of formal teaching.
We had the privilege of hearing from some leading usability researchers in developing countries about their opinions of the OLPC project. I’ve included those references that I could find along with some anecdotal notes that I recorded during plenary talks and individual conversations with leading researchers in the field. While other articles focus on financial/deployment issues, this article focuses on Education and how children will interact with OLPC.
This article is a compilation of ten key issues facing the OLPC project mentioned by other researchers and through conversation. There is a concern about how OLPC might fit into the larger infrastructure of education in developing nations. I personally feel that technology has a large role to play in the future of education (this is already seen with the exploding growth of companies like Smart Technologies that focus on the education market) but there is a need to understand how the technology fits within the ecology of education in developing nations.
This article is not meant to condemn the OLPC project as its aims are focused on goal that would benefit society as a whole (these comments could apply to projects such as Intel’s Classmate PC as well). Rather it asks: how can OLPC be improved? Is this the right approach? What other approaches could be used? Before massively deploying such a technology, it is crucial that we have this debate.
I hope you find this article informative, please feel free to leave any comments.
10. Focus: The focus of OLPC has been completely on the technology with the goal that a new technology will change how we educate children. This is like evaluating the quality of our education based on the type of glue that is used to bind textbooks or the images on the cover pages. There is a lack of focus on education and improved learning. People dismiss (ยกเลิก) the importance of teachers suggesting that computers and self directed learning will be a suitable replacement. Teachers, be they your peers, parents, or trained individuals are a crucial part of feedback system of learning.
9. Readability: “Many who test displays contend that in order for a display to be readable in sunlight, it must have a maximum brightness of at least 500 nits and a contrast ratio of at least 2 to 1. Some manufacturers of outdoor displays go for 1000 or even 1500 nits, but laptop and notebook screen brightness comes no where near 500 nits.” [Gerber, 2005]
8. Existing infrastructure: A recent study found 97 percent of people in Tanzania said they could access a mobile phone, while only 28 percent could access a landline [Prahalad, 2004]. While OLPC does not leverage (พลัง) such infrastructure, a simple voting system could dramatically improve a teachers’ understanding of how well their students were learning class material. Also, Internet is accessed mainly through cell phones and Internet cafés in developing nations. Thus equipping a classroom, particularly one that is not in a building (e.g., children sitting under a tree) poses serious infrastructure issues.
7. Not all learning can be done with an OLPC: Studies have shown that certain learning tasks such as mathematics are very difficult to learn using a computer keyboard and mouse and consequently result in decreased academic performance for students [Oviatt, 2006]. In particular, it has been shown that using a keyboard and mouse for solving mathematical questions requires significantly more time and results in more errors than using pen and paper. Researcher have also noticed that this decrease in performance is increased among the students that are struggling (ฝ่าฟัน) the most in the classroom as they are stuck trying to master both the course concepts and the technology at the same time.
6. Lack of content: content provision is a serious issue for these devices. If it is the expectation that teachers will produce all of their own content, using an OLPC could be more work that just buying a book and sharing it among students. Content needs to be provided free of charge. OLPC claims to be providing infrastructure but without content providers it will be impossible to use. This is the critical mass problem: what good is a fax machine if only one person in the world has one.
5. Keyboards: We need to ask ourselves what current practice is in the learning environment and design solutions that would fit the current practices of students and teachers. For example, if students are more used to using a slate (กระดานชนวน) , perhaps the keyboard and mouse metaphor (อุปมา) of existing systems is inappropriate. Similarly, if people are familiar with cell phone technology it may be useful to develop systems to support their current practices with cell phones. Perhaps what we need are more (touch sensitive) slates and (digital) black boards rather than OLPCs alone [Buxton, 2005].
4. Scalability: Lets say a teacher wants to get all 49 of their students in a single class to perform a particular exercise. Given that the instructor cannot see all 49 screens at once, how do they gage if students are confused or not understanding the task at hand? Each student is looking at their own private display rather than looking at the teacher/blackboard making it harder to gauge student engagement (ข้อตกลง) at a glance (ชำเรือง). Would it not be better to have a single large digital display than a classroom full of individual PCs? Take for example, the Smart Technologies Senteo system where each student can have a clicker to respond to polls in the classroom. The total cost of ownership would probably be less than the cost of a $100 laptop per student.
3. Ergonomics (เหมาะกับการทำงาน) : the fact that OLPC is designed as a laptop leads to ergonomical problems as students may not have a table that they can put the computer on. Thus they will likely have to place it on their laps for extended periods of time leading to discomfort that can also hinder (ขัดขวาง) learning.
2. Wrong Problem: While the One Laptop Per Child project focuses on providing technology to children in developing nations the major issue affecting student outcomes seems to be the training of teachers [Vegas, 2007]. With student to teacher ratios reaching 43:1 in primary Sub-Saharan African schools with only 69% of primary school teachers receiving any sort of formal training it seems that technology would only exacerbate (ทำให้รุนแรง) existing issues in the education system.
1. The Community of Learning vs. The Cult of the North American Individual: The name OLPC is a problem as the focus is on Personal Computers for Individuals ignoring the fact that community feedback is crucial part of learning. Self directed learning cannot be effective without feedback from peers, parents and teachers. Even when parents and peers are not available children will often huddle (จับกลุ่ม) around a single computer to collaborate and provide constructive feedback [Pawar, et al, 2006]. Developers can push this learning configuration further by providing interactivity for each child on the same display (through multiple mice and keyboards). Studies have shown that this configuration results in students being more engaged, faster and more accurately able to do problem solving tasks [Scott, et al., 2003]. Students need a learning community to provide the feedback needed to fully understand the material they are investigating. OLPC will likely do the opposite by pushing students away from each other to their own computers.
First section objective : to backup your course in moodle 1.9.12 to your computer
1. login by teacher account
2. click on the selected course
3. click backup, next ..
4. until got file, save as backup file to your computer
5. sample file : backup-tech-20120428-0931.zip
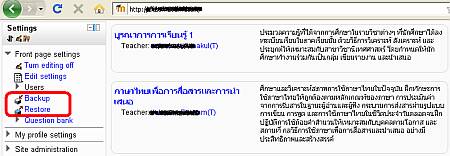
Second section Objective : to restore your backup file to moodle 2.2.1
1. login by admin account
2. Settings, Front page settings, Restore
3. Choose a file (from your computer in first section)
4. select category, continue ..
5. select : Delete the contents of this course and then restore
6. select :
– include activities
– include blocks
7. Settings to keep old students
– Keep current roles and enrolments = yes
– Keep current groups and groupings = yes
8. found message after the complete
“The course was restored successfully, clicking the continue button below will take you to view the course you restored.”