การเชื่อมต่อระหว่าง Server กับ Client ผ่าน FTP

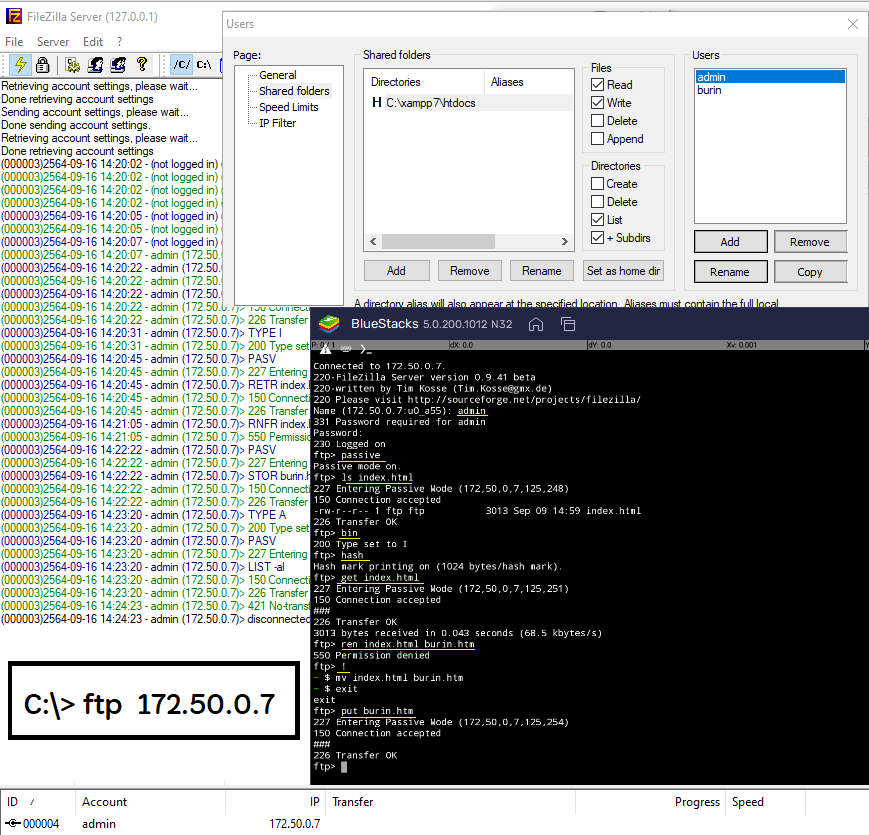
การเชื่อมต่อระหว่าง Server กับ Client เพื่อรับส่งแฟ้มจำนวนมากได้อย่างรวดเร็ว นักพัฒนามักเลือกใช้บริการ FTP และโปรแกรมที่ได้รับความนิยม คือ Filezilla ซึ่งโปรแกรม Filezilla ติดตั้งมาพร้อมกับโปรแกรม XAMPP ทำให้สามารถเปิดบริการ FTP Server ได้โดยง่าย ในฝั่งเครื่อง Server เมื่อเปิดส่วนของ Admin ต้องเริ่มต้นจากการสร้าง user และ password พร้อมกับกำหนด home directory และ permission เมื่อสร้างเสร็จแล้ว ก็ให้เครื่อง Client เชื่อมต่อเข้าไปผ่าน user ที่สร้างใหม่ โดยโปรแกรมที่ใช้ติดต่อเข้าไปจากเครื่อง Client มีหลายวิธีให้เลือกใช้ อาจเป็น Filezilla client หรือ FTP program ที่ทำงานบน android , linux, ios หรือ dos แล้วกิจกรรมการ put และ get ก็เกิดขึ้นหลังจากการ connect ได้สำเร็จแล้ว

ขั้นตอนการใช้งาน Filezilla บน Xampp 7.1.7

  1. Download xampp จาก apachefriends.org
    xampp-win32-7.1.7-0-VC14-installer.exe
  2. รุ่นนี้มีโปรแกรมมาเยอะ
    ทั้ง Server : Apache, MySQL, FileZilla FTP Server, Mercury Mail Server, Tomcat
    ทั้ง Program Languages : PHP, Perl
    ทั้ง Script : phpMyadmin, Webalizer, Fake Sendmail
    แล้วกำหนดห้องคือ c:\xampp71 เพราะก่อนหน้านี้ลงแบบ unzip ในห้อง c:\xampp56 ไว้แล้ว
  3. เปิด XAMPP Control Panel (C:\xampp\xampp-control.exe)
    แล้ว Start : FileZilla ทำให้เปิด port 21 (ftp) และ port 14147 (admin)
  4. คลิ๊ก Admin ของ FileZilla ใน XAMPP Control Panel เข้า admin ผ่าน port 14147
    จะเปิดโปรแกรม Filezilla Server สำหรับ Admin เดิมไม่ได้กำหนด Admin Password ไว้ ก็จะเข้าได้
  5. ถ้าต้องการให้ปลอดภัย ในการเข้า Admin หรือเข้าผ่าน Remote ได้
    เข้า Menu bar, Edit, Settings, Admin Interface setting
    คลิ๊ก Change admin password
    “Minimum password length is 6 characters. Leave empty to remove password. A password is required for remote administrationn to work.”
  6. สร้าง user ให้เค้าได้ใช้งาน
    เข้า Menu bar, Edit, Users, พบ Add Remove Rename Copy
    new user = “admin”
    General Page : Check – Enable account
    General Page : Check – Password = “p”
    Shared folders Page : Add – c:\xampp71\htdocs [Read, Write]
  7. Window+R, cmd จะพบกับ DOS prompt
    C:> ipconfig มองหาตัวเลขหลัง IPv4 Address
    C:> ftp 127.0.0.1
    user: admin
    password: p
    ftp> ?
    ftp> ls
    ftp> bye
  8. Download Filezilla client : https://filezilla-project.org
    แล้วก็ใช้ติดต่อกับ Filezilla server ที่มีแล้ว

http://www.thaiall.com/learn/useftp.htm
how to backup and restore moodle from 1.9.12 to 2.2.1

backup and restore course

28 เม.ย.55 เนื่องจากผมใช้ระบบอีเลินนิ่ง 2 รุ่นบนเครื่องบริการ 2 เครื่อง โดยเครื่องหนึ่งเป็น moodle 1.9.12 และอีกเครื่องเป็น 2.2.1 หากมี course ที่ต้องการให้ทั้ง 2 เครื่องใช้ได้ทั้งคู่ผ่านวิธี backup & restore ที่แยกบริการกันอิสระ ซึ่งไม่ใช้ user ร่วมกัน .. แต่ปัญหาที่พบคือ แฟ้มที่ backup ได้จาก 2.2.1 เป็น MBZ เมื่อนำไป restore ใน 1.9.12 ก็พบว่าไม่รู้จัก จึงสรุปในเบื้องต้นว่า ผมไม่สามารถย้าย course จากรุ่น 2.2.1 ลงไปรุ่น 1.9.12

จึงทดสอบใหม่ ด้วยการย้ายบางวิชาจาก 1.9.12 ไป 2.2.1 ซึ่งแฟ้มของ 1.9.12 เป็น .zip ผลคือ 2.2.1 รู้จักแฟ้ม backup รุ่นเก่า และใช้งานได้ โดยขั้นตอนการทดสอบเขียนไว้ใน paragraph ถัดไป และแบ่งไว้ 2 section คือ section แรกเป็นการ backup ส่วน section ที่สองเป็นการ restore ทำให้ต่อไปผมต้องเตรียมการสอนใน moodle 1.9.12 แล้วคัดลอกไปวางใน 2.2.1 เมื่อมีการเปลี่ยนแปลงเนื้อหา

First section
objective : to backup your course in moodle 1.9.12 to your computer
1. login by teacher account
2. click on the selected course
3. click backup, next ..
4. until got file, save as backup file to your computer
5. sample file : backup-tech-20120428-0931.zip

Second section
Objective : to restore your backup file to moodle 2.2.1
1. login by admin account
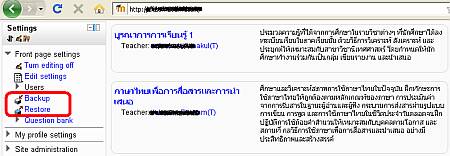
2. Settings, Front page settings, Restore
3. Choose a file (from your computer in first section)
4. select category, continue ..
5. select : Delete the contents of this course and then restore
6. select :
– include activities
– include blocks
7. Settings to keep old students
– Keep current roles and enrolments = yes
– Keep current groups and groupings = yes
8. found message after the complete
“The course was restored successfully, clicking the continue button below will take you to view the course you restored.”

http://docs.moodle.org/19/en/Course_restore
http://docs.moodle.org/22/en/Course_restore

กรณีศึกษาการย้ายโดเมนเนม

เล่าสู่กันฟังเรื่องการย้ายโดเมนเนมหนึ่งที่เคยจดไว้เมื่อ 20-Dec-1998 (ปีที่แล้วเกือบหลุดไป) เดิมฝากไว้กับ networksolutions.com ไปไว้กับ godaddy.com มีการดำเนินการดังนี้
1. ตรวจค่าใช้จ่าย พบว่า promotion ของ godaddy.com
Transfer Your Domain
From only $7.49/yr* & Free 1-yr extension.

2. เข้า godaddy.com แล้ว login แล้วคลิ๊กที่ Domains, Transfer Domain, [put domain name] , Proceed to Checkout
3. ตัวเลือก Nameservers ของผมเลื่อก change มาที่ godaddy.com ซึ่งอยู่ในขั้นตอนที่ 2/4
4. จ่าย $15.34 สำหรับ 2 ปี
5. มีอีเมลถึงของเจ้าของโดเมนเนม พบรหัสผ่านสำหรับยืนยัน ให้กดลิงค์นั้น ก็จะมีรายละเอียดให้ดำเนินการ หัวข้ออีเมลคือ Transfer of [domain name] – Action Required‏
6. เข้า My Products ของ godaddy.com แล้วคลิ๊ก Domain Manager

7. เข้า nsi.com แล้ว login แล้วคลิ๊ก MANAGE ACCOUNT แล้วคลิ๊ก My Domain Names
8. หัวข้อ Details for [domain name] พบคำว่า Domain Protect : on (Turn Off or Request Authorization Code)
9. ทำเครื่องหมายหน้า Leave Domain Protect off และ Request Authorization Code แล้ว Authorization Code จะส่งไปทางอีเมลใน 15 นาที
10. networksolutions.com ส่งอีเมลมาให้มีหัวข้อว่า Your Authorization Code Request‏ จากนั้นก็คัดลอก Authorization code ไว้

11. กลับเข้า godaddy.com เพื่อทำขั้นตอนที่ 2
12. เข้า Domains menu, select Pending Transfers. แล้วคลิ๊ก  Authorization,  Begin Transfer Authorization แล้วนำ Transaction ID และ Security Code ในอีเมล มากรอกใน 2 ช่องนี้
13. กรอก Authorization Code ที่ได้มาจาก networksolutions.com

14. เข้า mailbox เพื่อทำขั้นตอนที่ 3
15. รออีเมลจาก networksolutions.com แล้วเข้าไปเลือก Transfer Status : Confirm หรือ Reject