บทเรียนที่ 3 ชวนลูกทีมมือสมัครเล่นมารายงานตัวเป็น collaborators ผ่านแฟ้ม html ใช้ git สั่ง pull + push เข้า github.com

ตามหัวข้อเลย ผมมีลูกทีมเป็นมือสมัครเล่นกันหลายคน
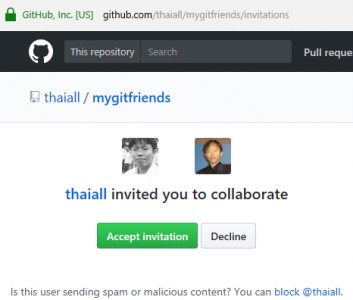
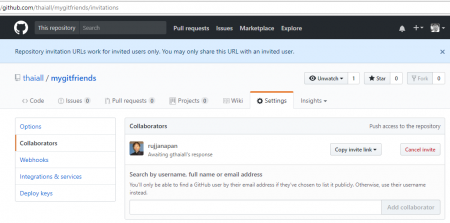
มีเป้าหมาย คือ ให้พวกเค้าไปสมัครใช้บริการ github.com
แล้วส่ง email ให้ผม เพื่อ invite พวกเค้ามาเป็น collaborators (สำหรับ push)
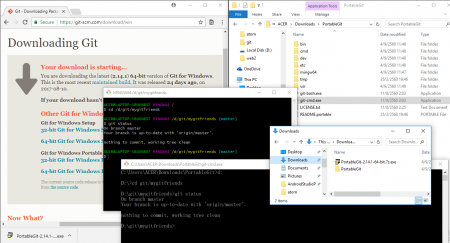
จากนั้นก็ให้ทุกคนไป download : Git for windows แบบ Portable
เพราะแต่ละคนอาจใช้ git กันในหลายรูปแบบ แนะนำแบบชั่วคราว แต่ใช้แบบใดก็ได้
แต่แบบ portable คือ ใช้ชั่วคราว หากไม่สะดวกเพราะไม่ได้ใช้กกับเครื่องของตนเอง
มี Interface ทั้งแบบ bash และ cmd จาก https://git-scm.com/download/win
คือ git-cmd.exe (cd d:/git/mygitfriends1)
และ git-bash.exe (cd /d/git/mygitfriends1)

แต่ถ้าใครอยากใช้ git กันนาน ๆ ก็เลือกแบบ install ได้
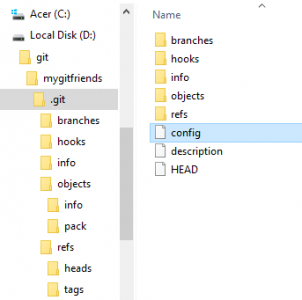
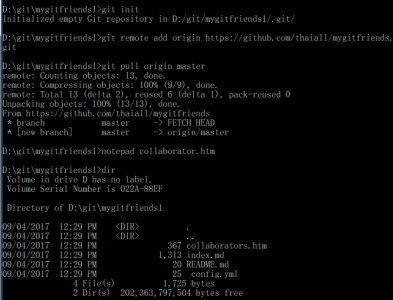
จากนั้นก็สร้างห้อง เช่น d:\git\mygitfriends1
แล้วให้ pull ดึง repository ของผมลงมา (เป็น public สามารถ pull ได้เลย)
แล้วแก้ไข tag LI ใส่ url ที่เป็น repository ของตนเอง เพื่อแชร์ให้ผมทราบ
ติ้งต่างว่า .. ผมเป็นหัวหน้าทีมของลูกทีมมือสมัครเล่น

มีขั้นตอน 9 ข้อ ดังนี้
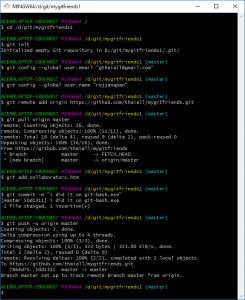
1. DOS> git init
จะสร้างห้อง .git แบบ hidden สำหรับการเริ่มต้นงาน repository
ในห้องนี้มีแฟ้มสำคัญคือ config ที่เปิดมาการตั้งค่าได้

2. DOS> git config –global user.email “you@example.com”
อย่าลืมเปลี่ยนเป็น e-mail ของตนเองนะครับ

3. DOS> git config –global user.name “Your Name”
อย่าลืมเปลี่ยนเป็น ชื่อของตนเองนะครับ

4. DOS> git remote add origin https://github.com/thaiall/mygitfriends.git
ต้องกำหนด email กับ name ให้เรียบร้อยก่อน
แล้วสั่งกำหนดว่า remote คือที่ไหน ที่ origin เชื่อมโยงด้วย

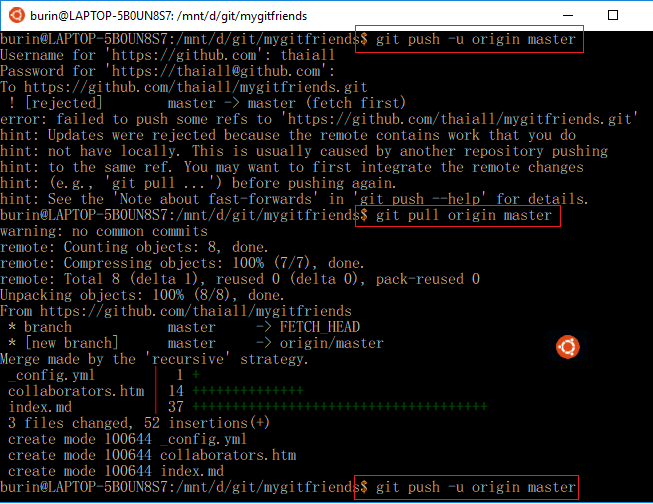
5. DOS> git pull origin master
ดึงข้อมูลจาก repository ใน master บน github.com
ลงมาเป็น origin ใน localhost หลังแก้ไขจะได้ push ขึ้นไป

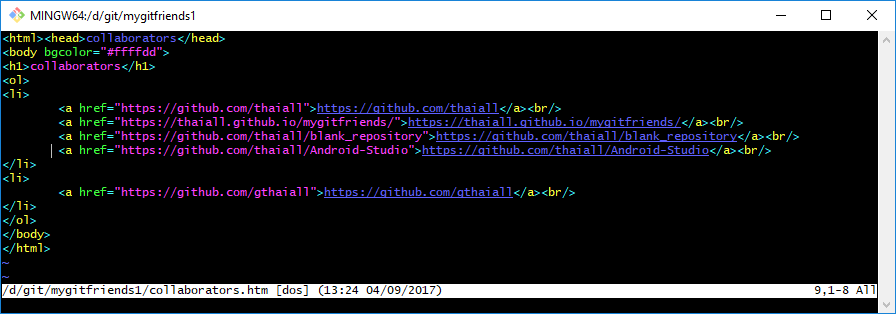
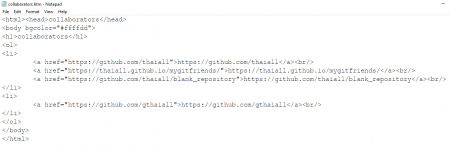
6. DOS> notepad collaborators.htm หรือจะใช้ vi ก็ได้ ถ้าถนัดนะครับ
เปิดแฟ้ม html มาแก้ไขเพิ่มเติมข้อมูลตาม TAG LI
ให้เพิ่ม link ของ repository ที่ตนเองเป็นเจ้าของ
หลังสมัคร github.com ด้วย email ของตน และสร้าง repository ไว้

<html><head>collaborators</head>
<body>
 <h1>collaborators</h1>
 <ol>
 <li>
 <a href=""></a><br/>
 </li>
 </ol>
</body>
</html>

7. DOS> git add collaborators.htm
หลังแก้ไขก็สั่ง add เพื่อบอกว่าแฟ้มนี้ คือ แฟ้มที่ปรับปรุง

8. DOS> git commit -m “i am gthaiall”
การสั่ง commit คือ การตรวจสอบว่ามีแฟ้มอะไรบ้างที่ต้องดำเนินการ และตีทะเบียนรุ่นให้ใหม่

9. DOS> git push -u origin master
ทำส่งรายละเอียด และการแก้ไขผ่าน push เปรียบเทียบระหว่าง master กับ origin
ขึ้นไปยังเครื่องบริการ github.com ที่เป็นสื่อกลางระหว่างนักพัฒนาทุกคน

สรุปว่า
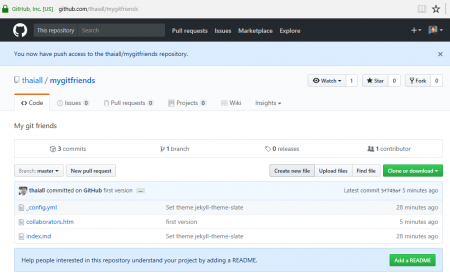
ผมนั่งดูใน github.com พบว่า นักพัฒนา ทำอะไรกับแฟ้ม collaborators.htm เมื่อใด
ที่พบมี รหัส commit [7864d75] ใหม่ พบว่า เพิ่ม 3 บรรทัด และลบ 2 บรรทัด

หลังจบการ push
ผมเข้าไปลบทุกอย่างในห้อง d:\git\mygitfriends1
รวมทั้ง .git ด้วย แล้วใช้ git-bash.exe ทำตามขั้นตอน 9 ข้อใหม่
หลังแก้ไขได้ รหัส commit [50d1311] ใหม่ พบว่า เพิ่ม 1 บรรทัด

หากมีคำถาม
เรื่อง git อยากชวนไปดูคลิ๊ปสั้น ๆ ของ SIPA เรื่อง แนะนำ และติดตั้ง Git
ที่ Minato Namikazerak ร่วมแบ่งปัน
ตอนเข้าไปแชร์ในกลุ่ม ไทย PHP เรื่องที่ผม push เข้า github.com

บทเรียนที่ 2 : การใช้ Git ตามคำแนะนำของ Github.com บน Bash on Ubuntu on Windows


เริ่มต้นกันเลย กับการสมัครใช้บริการพื้นที่ฟรี สำหรับเก็บ code ของ Github.com แล้วพบว่าหน้าแรกของ code ตอนที่ยังไม่มีแฟ้มใดเลย เค้าแนะนำคำสั่งมา 6 บรรทัดว่าจะสร้าง README.md อย่างไร ก็ลองพิมพ์ตามนั้นดูสักหน่อย เพราะ Nimit Suwannagate แนะนำคำสั่ง git ไว้ใน กลุ่ม ไทย PHP ที่เป็นการทำ backup_master เข้ามาเกี่ยวข้อง  มีคำสั่งน่าสนใจหลายคำสั่ง แต่ถ้าเริ่มต้นต้องคำสั่งบน Github.com นี่หละ สำหรับผมใช้ระบบปฏิบัติการ Windows 10 และมี Bash on Ubuntu on Windows ก็ถือโอกาสใช้ git บน Linux ที่อยู่ใน Windows

ขั้นตอนการใช้ git ตามที่ github.com แนะนำ ดังนี้

1. สร้าง folder ชื่อ git ที่ drive d
และสร้าง folder ชื่อ mygitfriends ใน git
จะได้ folder d:/git/mygitfriends เตรียมพื้นที่ไว้ทำงาน และอ้างอิงง่าย ๆ หน่อย
ที่ตั้งชื่อว่า mygitfriends จะลองชวนเพื่อนที่สนใจ
มาเข้ากลุ่ม collaborators ของ repository จึงตั้ง folder เป็นชื่อนี้

2. เข้า bash on ubuntu on windows
แล้วติดตั้ง git เพื่อทำงานใน ubuntu on windows

$sudo apt-get install git

3. นั่งมองคำสั่งที่ github.com แนะนำแป๊ปนึง มีความหมายทุกบรรทัด

echo "# mygitfriends" >> README.md
git init
git add README.md
git commit -m "first commit"
git remote add origin git@github.com:thaiall/mygitfriends.git
git push -u origin master

4. ใน bash on ubuntu on windows
ทำตามขั้นตอนดังนี้
4.1 $cd /mnt/d/git/mygitfriends

4.2 $echo “# Hello world! v.1” >> README.md

4.3 $git init จะสร้าง folder .git แล้วแฟ้มอีกเพียบขึ้นมาให้

4.4 $git add README.md

4.5 $git commit -m “first commit” ได้รับแจ้งว่าต้อง config email กับ name ก่อนสั่งงาน ก็ต้องสั่ง 2 บรรทัดนี้ก่อน
– git config –global user.email “you@example.com”
– git config –global user.name “Your Name”
หลัง config ก็สั่งใหม่ ก็เรียบร้อยด้วยดี
[master (root-commit) 2ff254f] first commit
1 file changed, 1 insertion(+)
create mode 100644 README.md

4.6 $git remote add origin https://github.com/thaiall/mygitfriends.git
หลังจากสั่ง $git remote ทำให้แฟ้ม config เพิ่มมา 3 บรรทัด
[remote “origin”]
url = https://github.com/thaiall/mygitfriends.git
fetch = +refs/heads/*:refs/remotes/origin/*

4.7 $git push -u origin master
เค้าแนะนำว่าให้ git pull ก่อน แล้วค่อย pushing again
! [rejected] master -> master (fetch first)
error: failed to push some refs to ‘https://github.com/thaiall/mygitfriends.git’
hint: Updates were rejected because the remote contains work that you do
hint: not have locally. This is usually caused by another repository pushing
hint: to the same ref. You may want to first integrate the remote changes
hint: (e.g., ‘git pull …’) before pushing again.
hint: See the ‘Note about fast-forwards’ in ‘git push –help’ for details.

4.8 $git pull origin master
warning: no common commits
remote: Counting objects: 8, done.
remote: Compressing objects: 100% (7/7), done.
remote: Total 8 (delta 1), reused 0 (delta 0), pack-reused 0
Unpacking objects: 100% (8/8), done.
From https://github.com/thaiall/mygitfriends
* branch master -> FETCH_HEAD
* [new branch] master -> origin/master
Merge made by the ‘recursive’ strategy.
_config.yml | 1 +
collaborators.htm | 14 ++++++++++++++
index.md | 37 +++++++++++++++++++++++++++++++++++++
3 files changed, 52 insertions(+)
create mode 100644 _config.yml
create mode 100644 collaborators.htm
create mode 100644 index.md
จากนั้นก็เปิดแฟ้ม .git/MERGE_MSG มาให้แก้ไข ก็ไม่ได้แก้ไขครับกด Ctrl+X ออกไป

4.9 $git push -u origin master

Counting objects: 6, done.
Delta compression using up to 4 threads.
Compressing objects: 100% (3/3), done.
Writing objects: 100% (5/5), 503 bytes | 0 bytes/s, done.
Total 5 (delta 1), reused 0 (delta 0)
remote: Resolving deltas: 100% (1/1), completed with 1 local object.
To https://github.com/thaiall/mygitfriends.git
5f749af..353f84d master -> master

5. ตรวจสอบผลงานตามขั้นตอนข้างต้น
หลังจากสั่ง $git push .. พบแฟ้ม README.md เข้าไปอยู่ใน github.com
มีเพียงแฟ้มเดียวที่วันที่เปลี่ยนอย่างถูกต้อง แฟ้มที่เหลือยังอยู่กันตามปกติ

5.1 ถ้า pull ใหม่ เค้าบอกว่า up-to-date แล้ว
From https://github.com/thaiall/mygitfriends
* branch master -> FETCH_HEAD
Already up-to-date.

5.2 ถ้า push ใหม่ เค้าบอกว่า up-to-date แล้วเช่นกัน
Username for ‘https://github.com’: [yourusername]
Password for ‘https://[yourusername]@github.com’:
Everything up-to-date

5.3 สรุปว่า ถ้า push หรือ pull โดยไม่เปลี่ยนแปลงแฟ้มใน origin
ก็จะไม่ส่งผลถืง master ที่อยู่ใน github.com เช่นกัน เพราะ git จะตรวจสอบก่อน

ผมก็สาวกวินโดว์ที่สนใจ Linux shell ของ Ubuntu บน windows 10

win10 : update 1511
win10 : update 1511

[ที่มา]
ช่วงปลายเดือนมิถุนายน 2559 มีโอกาสรู้จักกับ WSL
WSL = Windiws Subsystem for Linux
ซึ่งออกแบบให้เป็นเผ่าพันธุ์เดียวกับ Windows
ไม่ใช่ Linux ที่ทำงานบน VM หรือพัฒนาให้วางบน Windows แบบ Cygwin
แต่เป็น shell ที่พัฒนาใน windows ซึ่งทำงานได้เร็วกว่าเผ่าอื่นแน่นอน
และ Windows ไม่ได้ออกแบบให้ใช้ Linux shell ได้เต็มที่เหมือนตัวเต็ม
เพียงแต่ใช้คำสั่งต่าง ๆ แบบ Linux ได้บน Windows เท่านั้น
โดย Linux ตัวนี้คือ Bash ที่พัฒนาจาก Ubuntu
ไม่สนับสนุน GUI Desktops หรือ Application
https://msdn.microsoft.com/en-us/commandline/wsl/faq

win10 : update and security

[การใช้ WSL]
ถ้าจะใช้ WSL ต้องติดตั้ง Windows 10 Anniversary
(version 1608) แต่ยังไม่เปิดทั่วไป
ปัจจุบันเปิดให้สมัครเข้าโครงการ Windows Insider เพื่อเข้าร่วมทดลองใช้
ก็จะได้ใช้รุ่น Insider Preview Build 14316
แต่เครื่องที่ผมใช้อยู่ขณะนี้ลง Windows 10 November Update
(version 1511 build 10586 – major) มี license
ในอนาคต ถ้าไปใช้ Anniversary หรือเข้าร่วม Insider ก็คงได้ใช้ WSL ต้องรอก่อน
เพราะ WSL ยังเป็นรุ่นทดสอบบน Insider Preview
ถ้า Windows 10 Anniversary เปิดจำหน่าย License คงได้ upgrade ต่อไป
แต่ ณ วันนี้ Windows 10 รุ่น 1608 ยังไม่เปิดอัพเดทอย่างเป็นทางการ
https://en.wikipedia.org/wiki/Windows_10_version_history#Windows_10_Anniversary_Update_.28Version_1607.29

win10 : windows features

[License]
เครื่องที่ใช้อยู่มี License เป็น Windows 10 home version 1511
และยังไม่ถึงเวลาที่ microsoft จะเปิดให้อัพเดทเป็น 1608
เพราะรุ่น 1608 ที่เผยแพร่อยู่ เป็นรุ่นที่ต้องเข้าโครงการ Insider preview
มีข่าวเมื่อ 29 มิ.ย.59 ว่า microsoft จะเปิดให้ update
เป็น Windows 10 Anniversary Update – Major ตั้งแต่ 2 ส.ค.59
หมายความว่ารออีก 1 เดือนจึงจะได้ใช้รุ่น 1608 และก็จะได้ใช้ WSL อย่างเป็นทางการ
https://blogs.windows.com/windowsexperience/2016/06/29/windows-10-anniversary-update-available-august-2/