บทเรียนที่ 2 : การใช้ Git ตามคำแนะนำของ Github.com บน Bash on Ubuntu on Windows


เริ่มต้นกันเลย กับการสมัครใช้บริการพื้นที่ฟรี สำหรับเก็บ code ของ Github.com แล้วพบว่าหน้าแรกของ code ตอนที่ยังไม่มีแฟ้มใดเลย เค้าแนะนำคำสั่งมา 6 บรรทัดว่าจะสร้าง README.md อย่างไร ก็ลองพิมพ์ตามนั้นดูสักหน่อย เพราะ Nimit Suwannagate แนะนำคำสั่ง git ไว้ใน กลุ่ม ไทย PHP ที่เป็นการทำ backup_master เข้ามาเกี่ยวข้อง  มีคำสั่งน่าสนใจหลายคำสั่ง แต่ถ้าเริ่มต้นต้องคำสั่งบน Github.com นี่หละ สำหรับผมใช้ระบบปฏิบัติการ Windows 10 และมี Bash on Ubuntu on Windows ก็ถือโอกาสใช้ git บน Linux ที่อยู่ใน Windows

ขั้นตอนการใช้ git ตามที่ github.com แนะนำ ดังนี้

1. สร้าง folder ชื่อ git ที่ drive d
และสร้าง folder ชื่อ mygitfriends ใน git
จะได้ folder d:/git/mygitfriends เตรียมพื้นที่ไว้ทำงาน และอ้างอิงง่าย ๆ หน่อย
ที่ตั้งชื่อว่า mygitfriends จะลองชวนเพื่อนที่สนใจ
มาเข้ากลุ่ม collaborators ของ repository จึงตั้ง folder เป็นชื่อนี้

2. เข้า bash on ubuntu on windows
แล้วติดตั้ง git เพื่อทำงานใน ubuntu on windows

$sudo apt-get install git

3. นั่งมองคำสั่งที่ github.com แนะนำแป๊ปนึง มีความหมายทุกบรรทัด

echo "# mygitfriends" >> README.md
git init
git add README.md
git commit -m "first commit"
git remote add origin git@github.com:thaiall/mygitfriends.git
git push -u origin master

4. ใน bash on ubuntu on windows
ทำตามขั้นตอนดังนี้
4.1 $cd /mnt/d/git/mygitfriends

4.2 $echo “# Hello world! v.1” >> README.md

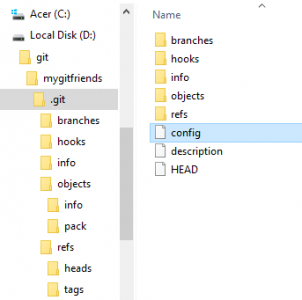
4.3 $git init จะสร้าง folder .git แล้วแฟ้มอีกเพียบขึ้นมาให้

4.4 $git add README.md

4.5 $git commit -m “first commit” ได้รับแจ้งว่าต้อง config email กับ name ก่อนสั่งงาน ก็ต้องสั่ง 2 บรรทัดนี้ก่อน
– git config –global user.email “you@example.com”
– git config –global user.name “Your Name”
หลัง config ก็สั่งใหม่ ก็เรียบร้อยด้วยดี
[master (root-commit) 2ff254f] first commit
1 file changed, 1 insertion(+)
create mode 100644 README.md

4.6 $git remote add origin https://github.com/thaiall/mygitfriends.git
หลังจากสั่ง $git remote ทำให้แฟ้ม config เพิ่มมา 3 บรรทัด
[remote “origin”]
url = https://github.com/thaiall/mygitfriends.git
fetch = +refs/heads/*:refs/remotes/origin/*

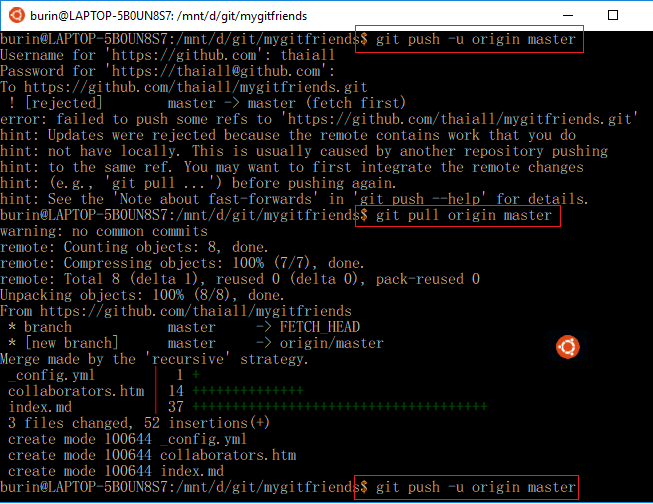
4.7 $git push -u origin master
เค้าแนะนำว่าให้ git pull ก่อน แล้วค่อย pushing again
! [rejected] master -> master (fetch first)
error: failed to push some refs to ‘https://github.com/thaiall/mygitfriends.git’
hint: Updates were rejected because the remote contains work that you do
hint: not have locally. This is usually caused by another repository pushing
hint: to the same ref. You may want to first integrate the remote changes
hint: (e.g., ‘git pull …’) before pushing again.
hint: See the ‘Note about fast-forwards’ in ‘git push –help’ for details.

4.8 $git pull origin master
warning: no common commits
remote: Counting objects: 8, done.
remote: Compressing objects: 100% (7/7), done.
remote: Total 8 (delta 1), reused 0 (delta 0), pack-reused 0
Unpacking objects: 100% (8/8), done.
From https://github.com/thaiall/mygitfriends
* branch master -> FETCH_HEAD
* [new branch] master -> origin/master
Merge made by the ‘recursive’ strategy.
_config.yml | 1 +
collaborators.htm | 14 ++++++++++++++
index.md | 37 +++++++++++++++++++++++++++++++++++++
3 files changed, 52 insertions(+)
create mode 100644 _config.yml
create mode 100644 collaborators.htm
create mode 100644 index.md
จากนั้นก็เปิดแฟ้ม .git/MERGE_MSG มาให้แก้ไข ก็ไม่ได้แก้ไขครับกด Ctrl+X ออกไป

4.9 $git push -u origin master

Counting objects: 6, done.
Delta compression using up to 4 threads.
Compressing objects: 100% (3/3), done.
Writing objects: 100% (5/5), 503 bytes | 0 bytes/s, done.
Total 5 (delta 1), reused 0 (delta 0)
remote: Resolving deltas: 100% (1/1), completed with 1 local object.
To https://github.com/thaiall/mygitfriends.git
5f749af..353f84d master -> master

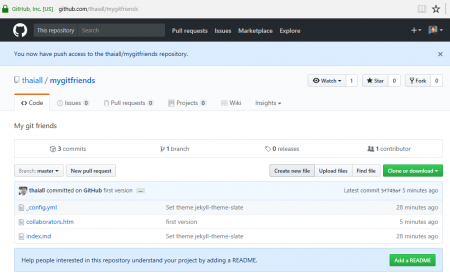
5. ตรวจสอบผลงานตามขั้นตอนข้างต้น
หลังจากสั่ง $git push .. พบแฟ้ม README.md เข้าไปอยู่ใน github.com
มีเพียงแฟ้มเดียวที่วันที่เปลี่ยนอย่างถูกต้อง แฟ้มที่เหลือยังอยู่กันตามปกติ

5.1 ถ้า pull ใหม่ เค้าบอกว่า up-to-date แล้ว
From https://github.com/thaiall/mygitfriends
* branch master -> FETCH_HEAD
Already up-to-date.

5.2 ถ้า push ใหม่ เค้าบอกว่า up-to-date แล้วเช่นกัน
Username for ‘https://github.com’: [yourusername]
Password for ‘https://[yourusername]@github.com’:
Everything up-to-date

5.3 สรุปว่า ถ้า push หรือ pull โดยไม่เปลี่ยนแปลงแฟ้มใน origin
ก็จะไม่ส่งผลถืง master ที่อยู่ใน github.com เช่นกัน เพราะ git จะตรวจสอบก่อน

ผมก็สาวกวินโดว์ที่สนใจ Linux shell ของ Ubuntu บน windows 10

win10 : update 1511
win10 : update 1511

[ที่มา]
ช่วงปลายเดือนมิถุนายน 2559 มีโอกาสรู้จักกับ WSL
WSL = Windiws Subsystem for Linux
ซึ่งออกแบบให้เป็นเผ่าพันธุ์เดียวกับ Windows
ไม่ใช่ Linux ที่ทำงานบน VM หรือพัฒนาให้วางบน Windows แบบ Cygwin
แต่เป็น shell ที่พัฒนาใน windows ซึ่งทำงานได้เร็วกว่าเผ่าอื่นแน่นอน
และ Windows ไม่ได้ออกแบบให้ใช้ Linux shell ได้เต็มที่เหมือนตัวเต็ม
เพียงแต่ใช้คำสั่งต่าง ๆ แบบ Linux ได้บน Windows เท่านั้น
โดย Linux ตัวนี้คือ Bash ที่พัฒนาจาก Ubuntu
ไม่สนับสนุน GUI Desktops หรือ Application
https://msdn.microsoft.com/en-us/commandline/wsl/faq

win10 : update and security

[การใช้ WSL]
ถ้าจะใช้ WSL ต้องติดตั้ง Windows 10 Anniversary
(version 1608) แต่ยังไม่เปิดทั่วไป
ปัจจุบันเปิดให้สมัครเข้าโครงการ Windows Insider เพื่อเข้าร่วมทดลองใช้
ก็จะได้ใช้รุ่น Insider Preview Build 14316
แต่เครื่องที่ผมใช้อยู่ขณะนี้ลง Windows 10 November Update
(version 1511 build 10586 – major) มี license
ในอนาคต ถ้าไปใช้ Anniversary หรือเข้าร่วม Insider ก็คงได้ใช้ WSL ต้องรอก่อน
เพราะ WSL ยังเป็นรุ่นทดสอบบน Insider Preview
ถ้า Windows 10 Anniversary เปิดจำหน่าย License คงได้ upgrade ต่อไป
แต่ ณ วันนี้ Windows 10 รุ่น 1608 ยังไม่เปิดอัพเดทอย่างเป็นทางการ
https://en.wikipedia.org/wiki/Windows_10_version_history#Windows_10_Anniversary_Update_.28Version_1607.29

win10 : windows features

[License]
เครื่องที่ใช้อยู่มี License เป็น Windows 10 home version 1511
และยังไม่ถึงเวลาที่ microsoft จะเปิดให้อัพเดทเป็น 1608
เพราะรุ่น 1608 ที่เผยแพร่อยู่ เป็นรุ่นที่ต้องเข้าโครงการ Insider preview
มีข่าวเมื่อ 29 มิ.ย.59 ว่า microsoft จะเปิดให้ update
เป็น Windows 10 Anniversary Update – Major ตั้งแต่ 2 ส.ค.59
หมายความว่ารออีก 1 เดือนจึงจะได้ใช้รุ่น 1608 และก็จะได้ใช้ WSL อย่างเป็นทางการ
https://blogs.windows.com/windowsexperience/2016/06/29/windows-10-anniversary-update-available-august-2/

แก้ปัญหา virtualbox ไม่ซ้ำจุดเดิมไม่ตก คาดว่า hd ไม่พอ

ubuntu บน virtualbox

วันสองวันนี้พบปัญหากับเครื่องคอมพิวเตอร์หนึ่ง
ผมใช้ virtualbox และติดตั้ง ubuntu 14.04.3 ตามคำแนะนำของหัวหน้า
แต่ใช้งานไปสักพักจะพบว่า Oracle VM VirtualBox Manager has stopped working
สำหรับเครื่องอื่นไม่พบปัญหา พบแต่เครื่องที่ผมใช้อยู่ประจำ การแก้ไข
1. เปลี่ยนรุ่นของ virtualbox ระหว่าง 4.2 , 4.3 และ 5.0.2
2. ปิด antivirus
3. เปลี่ยน folder ที่เก็บ .vdi เพราะสร้าง vdi จากเครื่องอื่นมาใช้ในเครื่องนี้
4. พยายามทำให้ hd เหลือพื้นที่เพิ่มขึ้น จาก 4 GB เป็น 7 GB
ณ ตอนนี้ก็ยังแก้ไขไม่ได้ คาดว่ากำหนด HD แบบ dynamic ไว้ 8 GB
แต่ HD เหลือจริงไม่ถึง 8 GB ทั้งที่การใช้งานจริงกินพื้นที่ประมาณ 1.5 GB เท่านั้น
.. เล่าปัญหาสู่กันฟังครับ แต่กับเครื่องอื่นไม่พบปัญหา

+ http://www.ubuntu.com/download/desktop

+ https://www.virtualbox.org/wiki/Downloads

ติดตั้ง LAN Card 2 แผง บน Ubuntu 14.04.1

network
network

9 ตุลาคม 2557 อยากทราบว่าในเครื่องมี LAN Card ติดตั้งไว้กี่แผง

ถ้าใช้คำสั่ง $lspci

พบ Ethernet controller : D-Link System Inc DGE-528T Gigabit Ethernet Adapter (rev06)

กับ Ethernet controller : Realtek Semiconductor Co., Ltd. RTL8111/8168/8411 PCI Express Gigabit Ethernet Controller (rev 0c)

และมีรายละเอียดอื่น ๆ เช่น Host bridge, PCI bridge, ISA bridge, การ์ดเสียง หรือ อุปกรณ์ยูเอสบี เป็นต้น

ถ้าใช้คำสั่ง $lshw -businfo -C network

จะแสดง Device มา 2 รายการคือ p2p1 และ p2p2 อยู่ใต้ class ชื่อ network

คือ DGE-528T Gigabit Ethernet Adapter

กับ RTL8111/8168/8411 PCI Express Gigabit Ethernet Controller

ถ้าใช้คำสั่ง $lshw -C network

จะมีรายละเอียดครบ รวมทั้งเลขของ mac address

จึงทราบว่า D-Link System Inc มี mac address คือ d8:fe:e3:a7:34:0a

และ Realtek Semiconductor Co., Ltd. มี mac address คือ e0:3f:49:ac:f3:92

ถ้าใช้คำสั่ง $ifconfig –a

จะพบว่ามี p2p1 และ p2p2 เปิดให้บริการพร้อมกับเลข mac address
เป็นคำสั่งที่นิยมใช้ในการตรวจสอบ network interfaces

มี LAN Card 2 แผง จะกำหนด IP Address อย่างไรดี

คิดว่าวงที่ออกอินเทอร์เน็ตจะให้ออกไปทาง 192.168.2.1

โดยเครื่องนี้มี IP คือ 192.168.2.5 โดย mac address คือ d8:fe:e3:a7:34:0a

แล้วสร้างเครือข่ายวงในอีก 1 วงผ่าน LAN Card แผงที่สอง

กำหนด IP เป็น 10.10.10.5  โดย mac address คือ e0:3f:49:ac:f3:92

วางแผลแล้วก็เข้าแก้ไขแฟ้ม interfaces ดังนี้

$sudo nano /etc/network/interfaces

auto p2p1

iface p2p1 inet static

address 192.168.2.5

netmask 255.255.255.0

up route add default gw 192.168.2.1 dev p2p1

hwaddress ether d8:fe:e3:a7:34:0a

dns-nameservers 8.8.8.8 8.8.4.4

auto p2p2

iface p2p2 inet static

address 10.10.10.5

netmask 255.255.255.0

hwaddress ether e0:3f:49:ac:f3:92

สั่งปิดเครื่องหรือ restart เครื่องใหม่

$sudo shutdown -r now

$sudo shutdown -h now

ตรวจสอบว่าเวลาออกเน็ตจะออกไปทางการ์ดแลนแผงใด

เมื่อใช้คำสั่ง $route

ให้ดูที่ค่า default ว่าจะไปหา gateway เบอร์ใด

Destination Gateway

default 192.168.2.1

10.10.10.0 *

192.168.2.0 *

ทำ ubuntu หาย แต่ชวน grub กลับมาได้

disk management
disk management

เล่าสู่กันฟัง (กันตนเองลืม)
.. เหตุเกิดเพราะได้คอมพิวเตอร์มา 1 เครื่อง
1. ผมให้ร้านแบ่ง partition เป็น 3 ส่วน
คือ Primary partition กับอีก 2 logical drive
ใน Extended partiton
โดยลง win7 ใน Primary partition ไปก่อน
2. มาถึงบ้านก็ลง Ubuntu 14.04 server
ใน drive สุดท้ายของ harddisk
โดยเลือกให้แบ่ง partition แบบอัตโนมัติ
แล้วก็เกิด /sda6 กับ /sda7 เป็น root กับ swap
ซึ่ง ubuntu ลง grub ทับ /dev/sda
แต่เพิ่ม option ให้เข้าถึง win7 ได้ .. จึงไม่เป็นไร
ยังเข้าได้ 2 OS ทั้ง ubuntu และ win7
3. ลง win8 ใน drive d: แต่ถ้า boot ด้วย win8
จะสลับให้เห็น drive d: เป็น drive c:
ถ้าลง drive เดียวกับ win7 ไม่ได้จะย้ายเป็น windows.old
แสดงว่าการลง windows 2 ตัว ใน drive เดียวกันจะมีปัญหา
4. ผลการลง win8 ซึ่งระบบปฏิบัติการได้สร้าง option ให้เลือก
ว่าจะเปิดด้วย windows ตัวใดก็ได้ ข่าวร้ายคือ ubuntu หรือ grub หายไป
แต่แก้ไขได้ สำหรับปัญหาที่ mbr ซึ่งเคยมี grub ถูก win8 ทับไป
5. การแก้ไขต้องใช้แผ่นของ ubuntu เพื่อ boot ขึ้นมา
แล้วเลือก rescure mode แล้วเลือกไปตามตัวเลือก
เมื่อเข้าไปที่ root prompt ผมลองใช้ update-grub
ในห้อง /etc/default/ ซึ่งเก็บแฟ้ม grub
ก็พบว่า update และเห็น win8 ในผลการ update
6. ขั้นตอนสุดท้าย
ให้ทำการ reinstall grub boot loader
โดยเลือกให้ติดตั้งใน /dev/sda
จากนั้นก็ reboot ซึ่งทำให้ grub ใน /dev/sda เหมือนเดิม
7. จากนี้ก็จะเลือกได้ว่าจะ boot เข้า os ใด
ระหว่าง ubuntu, win7 หรือ win8

ปล. ผมไม่เลือกใช้ virtual box สำหรับ ubuntu ตัวนี้
เพราะต้องการใช้ ubuntu ให้เหมือน os ที่ใช้งานจริง
ไม่ต้องการสภาพแวดล้อมเสมือน

RHL กับ RHEL

rhel : redhat enterprise linux

3 มิ.ย.56 เห็นเพื่อนชวนคุยเรื่อง Redhat 6.0 ทำให้นึกขึ้นได้ว่านั่นเป็นระบบปฏิบัติการที่ผมเคยลงสมัยหนุ่ม ๆ เพราะอยู่ CD แผ่นเดียวได้ แต่จำได้ว่าตอนนี้ใคร ๆ ก็ใช้ Fedora มิหนำซ้ำเครื่องหลักที่ใช้อยู่ก็ยังเป็น Redhat 5 พอหาข้อมูลจากอินเทอร์เน็ตก็ได้คำตอบเรื่อง รุ่นต่าง ๆ ของ Redhat ว่า Redhat Linux 6.0 (Hedwig) เผยแพร่ April 26, 1999 (Linux 2.2.5-15) แล้วก็พัฒนาไปถึง Redhat Linux 9 (Shrike) เผยแพร่ March 31, 2003 (Linux 2.4.20-8)
http://www.linuxjournal.com/article/7169
http://en.wikipedia.org/wiki/List_of_Fedora_versions
http://en.wikipedia.org/wiki/Red_Hat_Enterprise_Linux
http://en.wikipedia.org/wiki/Red_Hat_Linux

rhl : redhat linux
rhl : redhat linux

ในปี 2003 นี้เองที่บริษัทแยกเป็น Fedora project ที่เป็น Non-Profit และ Redhat Enterprise Linux (RHEL) ที่เป็น Profit company หากต้องการ download มาติดตั้งแบบไม่เสียค่าใช้จ่ายก็ต้องเลือก Fedora ปัจจุบันถึงรุ่น 18 ส่วน RHEL ตอนนี้ถึงรุ่น 7

http://en.wikipedia.org/wiki/Comparison_of_Linux_distributions
http://en.wikipedia.org/wiki/Usage_share_of_operating_systems

วันนี้ถ้าคิดจะลง linux server หรือ linux desktop สักตัว คงต้องคิดหนัก เพราะมีให้เลือกมากมาย ผลการจัดอันดับก็ออกมาชัดว่า ubuntu หรือ mint เป็นเบอร์ 1 ได้รับความนิยมในกลุ่ม Distro ส่วน RHEL, Debian, centos ก็เป็นเบอร์ 1 ฝั่ง OS Server แล้วถ้าไม่คิดจะลงก็มีตัวเลือกแบบ USB boot ให้อีก หรือจะลงผ่าน virtualbox ก็สามารถทำได้ง่าย

http://www.redhat.com/products/enterprise-linux/server/compare.html
http://www2.thaiadmin.org/board/index.php?topic=140114.0
http://www.centos.org/docs/2/rhl-gsg-en-7.2/ch-doslinux.html

* Ranking Distro Linux *
Mint , Mageia, Ubuntu, Debian
http://distrowatch.com/

* Ranking Linux OS *
Redhat Enterprise Linux, CentOS / ClearOS, Ubuntu / Debian
http://www.icewalkers.com/articles/best-linux-server.html

* Ranking Linux OS *
Redhat Enterprise Linux, Ubuntu, CentOS, Debian
http://www.ossdoc.com/2013/03/the-best-4-linux-server-operating.html