

Access level
ต.ย.โปรแกรมเชิงวัตถุ ชุดที่ 1 |
| Home | Contents | KM | Articles | Members | Sponsors | About us |
|
ปรับปรุง : 2556-09-17 (ปรับคำอธิบายโค้ดใหม่) |
|
| OOP :: intro ch1-12 :: keyword & sign :: method calling :: series #1 :: series #2 :: series #3 :: series #4 :: pro_pmy |
| | |
|
Access level
| ||
  class x {
  public static void main(String args[])   {
    System.out.println("hello world");
  }
}
// ===
  class y {
  public static void main(String args[])   {
    String s[] = {};
    x.main(s);
    x a = new x();
    a.main(s);
  }
}
| |
class x {
  static int i = 1;
  public static void main(String args[])   {
    ok1(); ok2(); ok3(); ok4();
  }
  static void ok1()   {
    System.out.println(i++);
  }
  public static void ok2()   {
    System.out.println(i++);
  }
  protected static void ok3()   {
    System.out.println(i++);
  }
  private static void ok4()   {
    System.out.println(i++);
  }
}
// Result of this program
// 1 2 3 4
| |
class x {
  int i = 1; // global variable
  public static void main(String args[])   {
    x a = new x();
    a.ok1(); a.ok2(); a.ok3(); a.ok4();
  }
  void ok1()   {
    System.out.println(i++ + ++i); //4
  }
  void ok2()   {
    System.out.println(++i + i++); // 8
  }
  void ok3()   {
    int i = 1; // local variable
    System.out.println(++i + i++); // 4
  }
  void ok4()   {
    System.out.println(i++ + ++i); // 12
  }
}
| |
| | |
|
Inheritance (review)
| ||
class father {
  int box1 = 5;
  static int box2 = 10;
  static Integer box3 = new Integer(15);
  static Integer box4;
}
// ===
class child extends father {
  public static void main(String args[]) {
    father gift = new father();
    father money = new father();
    gift.box1 = 7;
    System.out.println(gift.box1 + money.box1); // 12
    box2 = 1;
    System.out.println(gift.box1 + money.box2 + box2); // 9
    System.out.println(father.box2 + box2); // 2
    System.out.println(father.box3 + box3); // 30
    System.out.println(father.box4); // null
  }
}
// ===
class anotherchild {
  public static void main(String args[]) {
    System.out.println(father.box2); // 10
    System.out.println(father.box3); // 15
    System.out.println(father.box4); // null
  }
}
| |
| | |
|
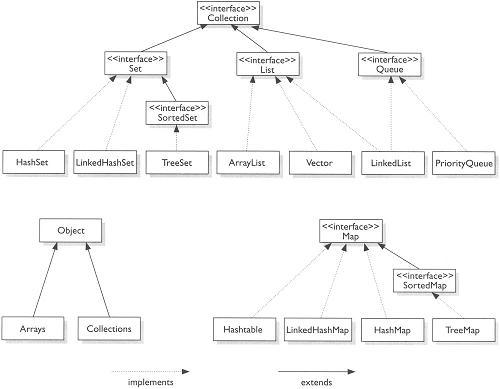
Collection & Array
| ||
import java.io.*;
class ar5max {
 public static void main(String args[]) throws IOException {
  BufferedReader stdin;
  stdin=new BufferedReader(new InputStreamReader(System.in));
  int buf[] = new int[5];
  int i,max=0;
  for (i=0;i<5;i++) {
    buf[i] = Integer.parseInt(stdin.readLine());
  }
  for (i=0;i<5;i++) {
    if (buf[i] > max) { max = buf[i]; }
  }
  System.out.println("Max = " + max);
 }
}
| |
class Friend {
  String name;
  Integer age;
  Friend(String name,Integer age) {
     this.name = name;
     this.age = age;
  }
}
class child {
  public static void main(String args[]) {
    Friend f[] = {
      new Friend("tom",9),new Friend("boy",6),
      new Friend("jack",11),new Friend("jojo",10)
   };
   System.out.println(f[0].name);
   System.out.println(f[1].name);
   System.out.println(f.length);
  }
}
| |
class child {
  static int elems=0;
  static Comparable ar[] = new Comparable[2];
  public static void main(String[] args) {
    insert(new Integer(6));
    insert(new Integer(5));
    java.util.Arrays.sort(ar);
    printresult();
  }
  static void insert(Comparable value) {
    ar[elems] = value;
    elems++;
  }
  static void printresult() {
    System.out.println(ar[0]+"|"+ar[1]);  // 1|2
  }
}
| |
class x {
  static int elems=0;
  static Comparable ar[] = new Comparable[5];
  public static void main(String[] args) {
    insert(new Integer(1));
    insert(new String("is 2"));
    insert(new Double(1.2));
    insert(new Boolean(true));
    insert(new Integer(2));
    printresult();
  }
  static void insert(Comparable value) {
    ar[elems++] = value;
  }
  static void printresult() {
    System.out.println(ar[0]+"|"+ar[1]+"|"+ar[2]+"|"+ar[3]);
    if(ar[0].compareTo(ar[4]) < 0)
      System.out.println("less than"); // print
    System.out.println(ar[2].getClass());
    // class java.lang.Double
  }
}
| |
import java.util.ArrayList;
class x {
  public static void main(String[] args) {
    Myclass work = new Myclass();
    work.insert(new Integer(1));
    work.insert(new Integer(2));
    work.printresult();
  }
}
class Myclass {
  ArrayList<Integer> ar = new ArrayList<Integer>();
  public void insert(Integer value) {
    ar.add(value);
  }
  public void printresult() {
    for(int i=0;i<ar.size();i++)
     System.out.print(ar.get(i)+"|");  // 1|2|
  }
}
| |
import java.util.ArrayList;
import java.io.*;
class x {
  public static void main(String[] args) throws IOException {
    Myclass work = new Myclass();
    BufferedReader stdin = new BufferedReader(new InputStreamReader(System.in));
    String buf = stdin.readLine();
    work.insert(new Integer(Integer.parseInt(buf)));
    buf = stdin.readLine();
    work.insert(new String(buf));
    buf = stdin.readLine();
    work.insert(new Integer(Integer.parseInt(buf)));
    buf = stdin.readLine();
    work.insert(new String(buf));
    work.printresult();
  }
}
class Myclass {
  ArrayList<Integer> id = new ArrayList<Integer>();
  ArrayList<String> name = new ArrayList<String>();
  public void insert(Object value) {
    if (value instanceof Integer) {
	id.add((Integer)value);
    } else {
    name.add((String)value);
    }

  }
  public void printresult() {
    for(int i=0;i<id.size();i++)
     System.out.println(id.get(i)+"|"+name.get(i));
  }
}
| |
import java.util.*;
public class child {
public static void main(String args[]) {
  TreeSet t = new TreeSet();
  t.add("B");
  t.add("C");
  t.add("A");
  t.add("D");
  System.out.println(t); //  [A, B, C, D]
  Iterator tn =t.iterator();
  while(tn.hasNext()){
    Object o = tn.next();
    System.out.print(o); // ABCD
  }
}
}
http://www.c-sharpcorner.com/UploadFile/433c33/vector-class-in-java/ | |
| | |
|
Constructor
| ||
class friend {
  friend() {
    System.out.println("ok 1");
  }
  void work() {
    System.out.println("ok 2");
  }
}
class child {
  public static void main(String args[]) {
    friend f = new friend();
    f.work();
  }
}
| |
class Myclass {
  void showValue() {
    System.out.println("xx");
  }
}
class x {
  public static void main(String args[]) {
    System.out.println("x");
    new Myclass().showValue();
    Myclass work = new Myclass();  // ไม่มี constructor ใน Myclass
    work.showValue();
  }
}
// Result of this program
// x
// xx
// xx
| |
class Myclass {
  static void showValue() {
    System.out.println("y");
  }
  Myclass() {
    System.out.println("x");
  }
}
class x {
  public static void main(String args[]) {
    System.out.println("z");
    new Myclass().showValue();
    Myclass a = new Myclass();
    a.showValue();
    new Myclass();
    // Myclass.Myclass();   error
    // showValue(); // ok if have extends Myclass
    Myclass.showValue(); // showValue must be static
  }
}
// Result of this program
// zxyxyxy
| |
| | |
|
Overload
| ||
// x.java
class a {
  int b;
  a() { p("Call object a"); }
  a(int i) { p("Number is " + i); }
  void c() { p("Receive nothing"); }
  void c(int i) { p("Number = " + i); }
  void c(String d) { p("Word = " + d); }
  static void p(String s) { System.out.println(s); }
}
class x {
  public static void main(String args[]) {
    a n = new a(2);
    n.c();
    n.c(3);
    n.c("This is test");
    new a();
  }
}
// Result of this program
// Number is 2
// Receive nothing
// Number = 3
// Word = This is test
// Call object a
| |
import java.io.*;
class a {
  int x[] ={0,0,0};
  void myget() throws IOException {
    BufferedReader stdin = new BufferedReader(new InputStreamReader(System.in));
    for(int i=0;i<=2;i++) x[i] = Integer.parseInt(stdin.readLine());
  }
}
class b extends a{
  static int c(int c1,int c2) { return (c1 + c2); }
  static int c(int c1,int c2,int c3) { return (c1 * c2 * c3); }
  public static void main(String args[]) throws IOException {
    b me = new b();
    me.myget(); // 1, 2, 3
    System.out.println(c(me.x[0],me.x[1])); // 3
    System.out.println(c(me.x[0],me.x[1],me.x[2])); // 6
  }
}
| |
| | |
|
Inheritance & Override
| ||
// my55.java
class my55 {
  public static void main(String args[]) {
    showValue();
  }
  static void showValue() {
    System.out.println("egg");
  }
}

// my56.java
class my56 {
  public static void main(String args[]) {
    System.out.println("hen");
    my55 work = new my55();
    work.showValue();
  }
}
// Result of my56
// hen
// egg
| |
// a1.java : รุ่นปู่ กำหนดค่าให้ i แล้วพิมพ์ 2 บรรทัด
class a1 {
  static int i;
  public static void main(String args[]) {
    seti();
    printnumber(i);
    printline();
  }
  static void seti() {
    i = 1;
  }
  static void printnumber(int j) {
    System.out.println("Number = " + j);
  }
  static void printline() {
    System.out.println("==========");
  }
}

// a2.java : รุ่นพ่อ กำหนดค่า i เอง ไม่ใช้ seti() และไม่พิมพ์เส้น
public class a2 extends a1 {
  static int i = 2;
  public static void main (String[] args) {
    printnumber(i);
  }
}

// a3.java : รุ่นหลาน เปลี่ยนรูปแบบเส้น และไม่ใช้ i จากรุ่นก่อน
public class a3 extends a2 {
  public static void main(String args[]) {
    printnumber(3);
    printline();
  }
  static void printline() {
    System.out.println("----------");
  }
}

// a4.java : รุ่นเหลน เปลี่ยน seti ให้เรียก setinew ที่ช่วยกำหนด i ใหม่
public class a4 extends a3 {
  public static void main(String args[]) {
    seti();
    printnumber(i);
    printline();
  }
  static void seti() {
    // override หรือสืบทอดเปลี่ยนได้เฉพาะ code
    i = setinew();
  }
  static int setinew() {
    i = 4;
    return i;
  }
}
| |
// a.java
public class a {
  a() {
    System.out.println("a constructor");
  }
}

// b.java
public class b extends a {
  b(int i) {
    System.out.println("b constructor " + i);
  }
  public static void main (String[] args) {
    b xxx = new b(100);
  }
}
// Result of this program
// a constructor
// b constructor 100
| |
// a.java is superclass
public class a {
  a() {
    System.out.println("a constructor");
  }
  void aa() {
    System.out.println("aa in class a");
  }
}

// b.java is superclass of c.java and subclass of a.java
public class b extends a {
  b() {
    System.out.println("b constructor");
  }
  void aa() {
    System.out.println("aa in class b");
  }
}

// c.java is subclass of b.java
public class c extends b {
  c() {
    System.out.println("c constructor ");
  }
  void aa() {
    System.out.println("aa in class c");
    super.aa(); // call aa in superclass
    new a().aa();
  }
  public static void main(String args[]) {
    c d = new c();
    d.aa();
    // aa(); can not run because aa should be static
    new a().aa();
  }
}
// Result of this program
// a constructor
// b constructor
// c constructor
// aa in class c
// aa in class b
// a constructor
// aa in class a
// a constructor
// aa in class a
| |
| | |
|
Composition
| ||
// a.java
public class a {
  a() {
    System.out.println("a constructor");
  }
}

// b.java
public class b {
  public a aa =  new a();
  static a bb =  new a();
  public static void main (String args[]) {
    b x = new b();
  }
  b() {
    System.out.println("b constructor");
  }
}
// Result of this program
// a constructor
// a constructor
// b constructor
| |
// a.java
public class a {
  a() {
    System.out.println("a constructor");
  }
}

// b.java
public class b {
  public a aa;
  public static void main (String args[]) {
    b x = new b();
    if(x.aa == null) x.aa = new a();
    // if(aa == null) aa = new a(); // static of aa required
  }
  b() {
    System.out.println("b constructor");
    new a();
  }
}
// Result of this program
// b constructor
// a constructor
// a constructor
| |
// เมื่อแปล wheel จะแปล car ด้วย
// wheel.java
public class wheel {
  private int a;
  private int b;
  public car thecar;
  wheel() {
    System.out.println("constructor wheel() from class wheel");
  }
  public void putwheel() {
    System.out.println("putwheel() from class wheel");
  }
}

// เมื่อแปล door จะแปล car ด้วย
// door.java
public class door {
  private int x;
  private int y;
  public car thecar;
  door() {
    System.out.println("constructor door() from class door");
  }
  public void putdoor() {
    System.out.println("cleandoor() from class door");
  }
}

// แปล car จะแปล และได้ wheel.class และ door.class
// car.java
public class car {
  public wheel thewheel =  new wheel();
  public door thedoor =  new door();
  public static void main (String args[]) {
    car  x = new car();
    x.thewheel.putwheel();
    x.thedoor.putdoor();
  }
  car() {
    System.out.println("Constructor car()");
  }
  public void drive() {
    System.out.println("drive()");
  }
}
// Result of this program
// constructor wheel() from class wheel
// constructor door() from class door
// Constructor car()
// putwheel() from class wheel
// cleandoor() from class door
| |
| | |
|
Package
| ||
package burin;
public class x {
  public static void main (String args[]) {
    System.out.println("NTU");
    myhome();
  }
  protected static void myhome() {
    System.out.println("University");
  }
}
| |
package burin;
class y {
  public static void main (String[] args) {
     x a = new x();
     a.myhome();
  }
}
// ===
package burin;
public class y extends x {  }
| |
import burin.*;
class z {
  public static void main (String[] args) {
     x a = new x();
     a.myhome();
  }
}
| |
// yonok1.java
package burin;
public class yonok1 {
  public yonok1() {
    System.out.println("YONOK");
  }
}

// yonok2.java
package burin;
public class yonok2 {
  public yonok2() {
    System.out.println("Burin Rujjanapan");
  }
  public void prt(String s){
    System.out.println(s);
  }
}

// import testpackage.java
import burin.*;
class testpackage {
  public static void main (String[] args) {
    yonok1 xxx = new yonok1();
    yonok2 yyy = new yonok2();
    yyy.prt("test of package");
  }
}
// Result of this program
// YONOK
// Burin Rujjanapan
// test of package
| |
| | |
|
try .. catch ..
| ||
Compile-time errors :
class x {
  public static void main(String args[]  {
    System.out.println("aa");
  }
}
หรือ
Run-time errors :
class x {
  public static void main(String args[]) {
    for(int j=5;j>-5; j--) {
      System.out.println(5/j); // เกิด arithmetic error ขณะ run-time
    }
  }
}
| |
class x {
  public static void main(String args[]) {
    System.out.println("===== start =====");
    try {
      for(int j=5;j>-5; j--) {
        System.out.println(7/j);
      }
    } catch (ArithmeticException e) {
        System.out.println("You divide by zero");
    }
    System.out.println("===== finish =====");
  }
}
// Result of this program
// ===== start =====
// 1
// 1
// 2
// 3
// 7
// You divide by zero
// ===== finish =====
| |
class x {
  public static void main(String args[]) {
    System.out.println("===== start =====");
    for(int j=2;j>-2; j--) {
      try {
        System.out.println(7/j);
      } catch (ArithmeticException e) {
        System.out.println("You divide by zero");
      } catch (ArrayIndexOutOfBoundsException e) {
        System.out.println("Error on array");
	  } finally {
         System.out.println("Each case");
      }
    }
    System.out.println("===== finish =====");
  }
}
// Result of this program
// ===== start =====
// 3
Each case
// 7
Each case
// You divide by zero
Each case
// -7
Each case
// ===== finish =====
| |
| "Imagination is more important than knowledge" - Albert Einstein |