Remote Authentication Dial In User Service (RADIUS) is a networking protocol that provides centralized Authentication, Authorization, and Accounting (AAA) management for computers that connect and use a network service. RADIUS was developed by Livingston Enterprises, Inc. in 1991 as an access server authentication and accounting protocol and later brought into the Internet Engineering Task Force (IETF) standards.
More Info
To upgrade your wireless router to support WPA.
To upgrade your wireless network adapter to support WPA.
Router configuration
1. Open a Web Browser
2. In the address bar type http://192.168.2.1
3. Click on Security in the left hand column under Wireless
4. Enter your password if any and click Submit
5. Select WPA-PSK (no server) from the Security Mode section
Note: If you have a RADIUS infrastructure, select WPA (with Radius Server)
6. Enter your Pre-shared Key
Note: You can mask your Pre-shared Key by selecting Obscure PSK
7. Click on Apply Changes
Network adapter configuration
1. Click Start, and then click My Network Places
2. Under Network Tasks, click View Network Connections. (Or, you can right-click My Network Places on the desktop, and then click Properties.)
3. Right-click the connection that you use for the Internet, and then click Properties
4. Under Wireless Networks, check Use Windows to configure my wireless networking settings
5. Select your wireless network under Available networks, click Configure.
6. Under Association select, Network Authentication and choose the equivalent Security Mode
7. Under Data encryption choose the equivalent encryption protocol
8. Enter your network key
9. Click Ok
Features of WPA Security
The following security features are included in the WPA standard:
WPA Authentication
For environments without a Remote Authentication Dial-In User Service (RADIUS) infrastructure, WPA supports the use of a preshared key. For environments with a RADIUS infrastructure, Extensible Authentication Protocol (EAP) and RADIUS is supported.
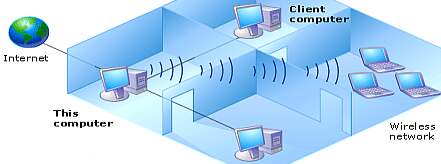
17 พ.ค.53 จากเหตุที่ในบ้านมีเครื่อง PC กับ ADSL Router และมี Wireless Adapter แบบ USB ตัวหนึ่งยี่ห้อ SMC แต่ไม่มี Access Point ที่ปล่อยสัญญาญ Wireless แล้ววันหนึ่ง มีเพื่อนหลายคนหิ้ว Notebook มาทำรายงานที่บ้าน ขอใช้ Wireless เพราะคิดว่าบ้านผมมี Hot spot แต่ผมไม่มี Acess point ปล่อยสัญญาณ Internet จึงปรับให้ PC เปิดบริการเน็ตไร้สายใช้วิธี Peer-to-Peer แบบ Adhoc ผ่าน ICS ซึ่งเป็นการทำให้เครื่อง PC และ Wireless Adapter รวมกันเป็น Access Point ให้บริการอินเทอร์เน็ตแบบไร้สาย แล้วเชื่อมอัตโนมัติออกไปทาง UTP ที่ PC เชื่อมอยู่กับ ADSL Router อาจอธิบายได้ตามภาพ (Bridge Connection คือการเชื่อมต่อระหว่าง 2 เครือข่าย)
มีขั้นตอนการติดตั้งใน PC 7 ข้อแรกส่วนข้อ 8 ดำเนินการกับเครื่องเพื่อน มีขั้นตอนดังนี้ 1) เข้า Control Panel, Add/Remove Program เพิ่มโปรแกรม Network Services/Peer-to-Peer ของ Windows 2) ติดตั้ง Wireless Adapter ให้เรียบร้อยสำหรับเครื่องที่ต่อสายแลนและเป็นเครื่องที่จะเปิดเป็น Access Point ถ้าเป็น Notebook ที่มี Wireless จะมีอยู่ในเครื่องแล้วไม่ต้องไปหาซื้อเพิ่ม แต่ถ้าเป็น PC ก็ต้องหาอุปกรณ์แบบ USB มาติดตั้งเพิ่มตัวหนึ่งประมาณ 5 ร้อยบาท 3) เข้า Control Panel, Network Setup Wizard เพื่อทำให้เครื่องบริการ ICS เชื่อมระหว่าง Wireless Adapter และ UTP มีผลให้เครื่อง PC บริการ DNS กับเครื่องที่เข้ามาเกาะสัญญาณไร้สาย แล้วผ่านออกไปทางสายแลนได้ ในระหว่างติดตั้งให้เลือก This computer connects directly to the Internet. The other computers on my network connect to the Internet through this computer. ถ้าให้เลือก Local Area Connection ก็เลือกแบบ LAN Card ที่ออก UTP 4) เลือก Properties ของ Wireless Adapter , Wirless Networks, Advanced, Computer-to-computer (ad hoc) networks only 5) เลือก Properties ของ Wireless Adapter , Wirless Networks, Add Network name(SSID), WEP, Network Key 6) เลือก Wireless Network status, Properties, Internet protocol, IP = 192.168.0.1, Gateway = 192.168.0.1, DNS = 192.168.0.1 จะต่างกับการตั้ง LAN เข้ากับ ADSL ที่ติดตั้งก่อนหน้านี้ สำหรับ Gateway ของผมเป็น 192.168.1.1 7) เลือก Properties ของ Local Area Connection Status , Advanced, แล้ว Check บน Allow other network users to connect through this computer’s Internet connection 8 ) ในเครื่องของเพื่อนที่กรอกรหัส Network key แล้ว สามารถปล่อยให้รับ IP อัตโนมัติ หรือไปกำหนด Wireless Network status, Properties, Internet protocol, IP = 192.168.0.2 ถึง 255 , Gateway = 192.168.0.1, DNS = 192.168.0.1
งานนี้ทำเพื่อให้บริการชั่วคราวกับเพื่อนที่นำ Notebook มาใช้ ทำให้ผมไม่ต้องไปหายืม Access point ที่ไหนมาติดตั้งเพิ่มครับ สะดวกไปอีกแบบ แต่จะสะดวกกว่านี้ถ้าไปซื้อ Access Point มาเชื่อมเพิ่ม หรือ ADSL ตัวใหม่ที่บริการ Wireless แล้วบริการ Hot spot แบบที่ร้านกาแฟเขาบริการ ซึ่งผมมีแผนนั้นในใจแล้ว และรอว่าตัวเก่าเสียเมื่อใดจะหาซื้อรุ่นที่สมเหตุสมผลมาใช้ครับ