ติดตั้ง Lubuntu บน Virtualbox บน Win10

Lubuntu คือ ระบบปฏิบัติการที่ทำงานเร็ว ขนาดเล็ก ใช้ทรัพยากรน้อยในการติดตั้ง ใช้งานง่าย พัฒนาต่อยอดมาจาก Ubuntu.

virtualbox
virtualbox

Lubuntu is a fast and lightweight operating system with a clean and easy-to-use user interface. The core of the system is based on Linux and Ubuntu. Lubuntu uses the minimal desktop LXDE, and a selection of light applications. Because of this, Lubuntu has very low hardware requirements. Lubuntu was founded by Mario Behling and has been grown for many years by Julien Lavergne. Please join us and install Lubuntu on your computer.

Lubuntu : https://lubuntu.net/downloads/
เลือก lubuntu-17.10-desktop-amd64.iso ขนาด 925 MB
Blog : 4 ลีนุกซ์ดิสโทรสุดเจ๋งสำหรับฮาร์ดแวร์เก่า

lubuntu accessories
lubuntu accessories

Install Lubuntu in Virtualbox (Host key = Right Ctrl Button)

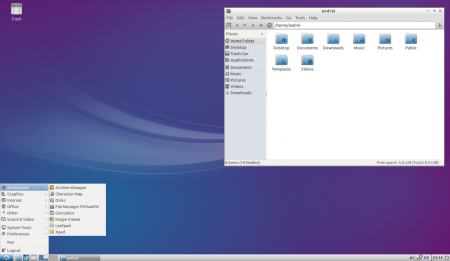
1. Create
Name: lubuntu1710, Type: linux, Version: Ubuntu (64bit)
2. Ram : 1024MB (Min 512MB)
3. Harddisk : Create Virtual Harddisk , 
.vdi = Virtualbox Disk Image , Dynamic
4. Image size : 10GB
C:\Users\ACER\VirtualBox VMs\lubuntu1710.vdi
5. click : IDE ทุติยภูมิหลัก จาก หน่วยเก็บข้อมูล
เลือกดิสก์อิมเมจ , lubuntu-17.10.1-desktop-amd64.iso
6. Start : lubuntu1710
7. ติดตั้ง lubuntu (Try Lubuntu without installing)
- English
- Install Lubuntu 
- English, Continue
- Uncheck anything for download, Continue
- Erase disk and install Lubuntu, Install Now
- Write the changes to disks?, Continue
Partition #1 of SCSI3 (0,0,0) (sda) as ext4 : formatted
- Where are you? : Bangkok, Continue
- Keyboard layout : English(US), Continue
- Your name : lubuntu
Computer's name : lubuntu-VirtualBox
Pica a username : lubuntu
Choose a password : lubuntu	
Confirm your password : lubuntu
and Continue
- Wait .... installing
- Restart Now, Click

การใช้งาน Lubuntu
1. มุมล่างซ้ายมีปุ่ม Start คล้าย Windows
Click, Internet, Firefox Web Browser

2. มีโปรแกรมให้ใช้งานมากมาย
Xfburn
Mpv Media Player
guvcview
Audacious
GNOME MPV
PulseAudio Volume Control
AbiWord
Gnumeric
Firefox Web Browser
Pidgin Internet Messenger
Sylpheed
Transmission
Document Viewer
mtPaint Graphic Editor
Simple Scan
GNOME Disks
PCManFM
Leafpad
Xpad
และ LXTerminal เพื่อเข้า Shell prompt

3. เปิด LXTerminal ใน System Tools
แล้วพิมพ์ $sudo ls
กรอก password ว่า lubuntu
เป็นการเริ่มต้นกับ Shell prompt

4. env | grep SHELL
พบ SHELL=/bin/bash

http://www.thaiall.com/os/virtualbox.htm

ลง line pc เพื่ออัพเกรดไม่สำเร็จ

permission problem
permission problem

[ที่มา]
หลายครั้งที่ติดตั้ง หรืออัพเกรดโปรแกรมไม่สำเร็จ
พบปัญหาการไม่อนุญาต เนื่องจากสิทธิการเข้าถึงแฟ้ม หรือโฟรเดอร์
ครั้งนี้จะติดตั้ง line pc รุ่นใหม่ ปรากฎว่า update ไม่ได้
คลิ๊ปปุ๊ปก็ฟ้องทันที ตำแหน่งที่ฟ้อง คือ ห้อง temp
ข้อความที่พบคือ
Windows cannot access the specified device path, or file. You may not have the appropiate permissions to access the item.

[ที่ได้ทดลอง]
ก่อนหน้านี้ก็ uninstall line pc ออกจากเครื่อง
แล้ว reboot ใหม่ ก่อนจะติดตั้ง line pc ใหม่
แต่ก็ยังพบปัญหาเดิม

[สรุปผล]
แก้ไขด้วยการเข้าไป folder ที่ได้รับแจ้ง
แล้วลบแฟ้ม และโฟรเดอร์ที่สงสัยออกให้หมด
ถือเป็นการล้างแฟ้มที่ไม่ใช้ออกไปด้วย
จากนั้นก็ลง line pc ได้ตามปกติ

กฎข้อแรกหลังซื้อ Smart Phone [2]

facebook
facebook

คำเตือน .. อย่าไว้ใจว่า App ที่ติดตั้งมากับตัวเครื่องว่าจะเป็น new version

หลังซื้อสมาร์ทโฟนยี่ห้อ F-Phone รุ่น F823 ราคา 2900 บาท
เมื่อใช้งานไปได้ประมาณ 5 วัน พบว่า App ใช้งานได้ในระดับหนึ่ง
ก็พอรับได้ ยกเว้น Facebook ที่ not response บ่อยมาก หรืออืดมาก
ลองใช้ App Cache Cleaner ที่แนะนำโดย อ.เมธัส
ก็ไม่มีผลต่อ Facebook มากนัก
https://play.google.com/store/apps/details?id=mobi.infolife.cache&hl=th

ต่อมา อ.ชอ แนะนำว่าน่าจะ upgrade facebook
เมื่อถอน และติดตั้งใหม่ พบว่า facebook ทำงานได้ดีกว่าเดิม
เร็วพอ ๆ กันกับ App อื่น เช่น Line หรือ Instagram
ดังนั้น เสนอกฎข้อแรกหลังซื้อ Smart Phone
อัพเกรด App ที่ใช้งาน และถอน App ที่ไม่ใช้ออก
เช่น  facebook, line, instagram, twitter เป็นต้น

specification ของ F-Phone รุ่น F823
http://www.thaiall.com/blog/burin/6816/

ติดตั้ง Graphics Card ของ VisionTek 1290 บาท

graphics card
graphics card

มีปัญหาเยอะครับที่พบในแต่ละวัน
แก้ไขได้บ้าง ไม่ได้บ้าง .. ไปตามเรื่อง
แต่วันนี้ แก้ปัญหาจอสั่นที่เพื่อนอาจารย์ต้องใช้งาน
จึงถ่ายคลิ๊ปเก็บไว้ ว่าทำอย่างไร เผื่อไว้ดูในคราวหน้า
เพราะอาจลืมเลือนเหตุการณ์ไปตามกาลเวลา
โดย graphics card มี 3 port ให้ใช้
คือ DVI port, VGA Port และ HDMI Port
ไม่ได้มีเฉพาะ VGA Port อย่างเดียว เหมือน on board

รุ่นที่ผมใช้ สำหรับเครื่องเก่า ที่ใช้ WinXP ซื้อประมาณปี 2007
VisionTek 900270 Radeon HD 4350
512MB 64-Bit DDR2 PCI Express 2.0 x16
Low Profile Ready Video Card
ราคา $42.99 หรือ 1290 บาท
http://www.newegg.com/Product/Product.aspx?Item=N82E16814129149

การทำ Shared Folders ของ Debian กับ VirtualBox

share folders
share folders

29 พ.ย.55 ในกรณีต้องการ share folders จาก host ที่เป็น windows ไปให้เครื่อง guest ที่เป็น Debian ใน Oracle VirtualBox  มีขั้นตอนดังนี้

http://mirror1.ku.ac.th/debian-cd/6.0.5-live/i386/iso-hybrid/

1.1 เข้า Debian ใน VirtualBox
https://www.virtualbox.org/manual/ch04.html
1.2 menubar, Applications, Accessories, Terminal
$su
#apt-get update
#apt-get upgrade
#apt-get install make gcc
#uname -a
#apt-get install linux-headers-2.6.32-5-686
1.3 เตรียมพร้อมกับการ share และการติดตั้ง
#cd /media/cdrom/
แล้ว share folder ผ่าน menubar, Device, Share Folders
1.4 สั่งประมวลผล script จาก cd ที่มาจาก Install guest additions
#sh ./VBoxLinuxAdditions.run
แล้ว restart
จะพบว่ามีการทำ automount ใน /media/..
ตรวจด้วยคำสั่ง #mount
1.5 หากจะเข้าใช้งาน ต้องเปลี่ยน group ของ user เป็น vboxsf
แล้ว restart จึงจะเข้า folder ที่ share มาจากระบบ Windows เพื่อใช้งานได้

การติดตั้ง php5.2.12 บน iis7 ใน win7

วิธีที่ 1 : เรียกใช้ .php ผ่าน localhost ได้
1. ติดตั้ง iis7 ใน win7 ผ่าน Control Panel, programs and features แล้ว Turn Windows Features on or off แล้วเลือกลงโปรแกรมให้ครบ อาทิ Internet Information Services, World Wide Web Services, Application Development Features, CGI และอื่น ๆ
2. download โปรแกรมจาก
3. คลาย php-5.2.12-Win32-VC6-x86.zip ลงใน c:\php
4. เข้าห้อง c:\php แล้วเปลี่ยนชื่อแฟ้ม php.ini-recommended เป็น php.ini
แล้วเพิ่ม cgi.force_redirect=0
แล้วเปลี่ยน extension_dir = “c:\php\ext”
5. เข้า Control Panel, Administrative Tools, Internet Information Services (IIS) Manager ในหัวข้อ IIS ให้เลือก double click บน Handler Mappings แล้วเลือก Add Module Mapping เพิ่ม Request path เป็น *.php แล้ว Executable เป็น c:\php\php5isapi.dll แล้ว Name เป็น PHP
6. กลับไปคลิ๊ก Sites, Default Web Site แล้ว double click ISAPI Filters แล้วคลิ๊ก Add ให้ Filter name = php และ Executable = c:\php\php5isapi.dll
7. ลองเขียน x.php ใน c:\inetpub\wwwroot ได้ครับ
วิธีที่ 2 แต่ก็ไม่ ok
ทดสอบกับ php-5.3.8-nts-Win32-VC9-x86.zip แล้วใช้ไม่ได้
เพราะคลาย .zip แล้วไม่พบ php5isapi.dll พบแต่ php5.dll
เมื่อลองใช้แทน php5isapi.dll ก็พบว่า iis7 ไม่ยอมรับ
หลังติดตั้ง ก็ยังไม่ run .php เห็น source code ครับ
วิธีที่ 3 แต่ก็ไม่ ok
ติดตั้งโปรแกรมของ Microsoft
หลังติดตั้ง ก็ยังไม่ run .php เห็น source code ครับ